Today’s shoot was planned to be at Fort Lytton 9.30am. I have not been to this location before so I did not know what to expect. Our group were split on the idea of shooting here as some of us could not see how to use this location to be creative and did not think the time of day was suitable for the best lighting conditions. I decided as a photographer I should be able make something out of any situation so I felt this challenge would help me think outside the box.
I left early to have a snoop around, I took extra gear today. I packed some studio lights and a few torches and my speed light. Lucky we could get one car close to the fort so it wasn’t too far to carry. I scouted around the place, the fortress was partially underground, there were passageways, munition stores, huge turret guns, lots of separate areas most with machine gun peep holes to shoot approaching enemy through. There was a mote surrounding the fort with very high dirt mounds that make it very difficult to attack in from the rear where you could be flanked.
I could not believe the amount of munitions that must have been stored here the place is a labyrinth of thick steel and concrete tunnels. The concrete bunkers were strategically placed and well prepared to protect any invasion of enemy ships via the Brisbane river.
I noticed the cracks in the concrete on the ceiling above me, the hairline fractures had a green mould where many years of moisture has creped through the structure. It almost looks like a marble effect. The windows let the light filter in the rooms are surprisingly light.
I took my time exploring the fort I imagined what it might have been like when it was in full action. It would have been top secret stuff back in the days of the war, I can only imagine how much work it was to construct the place. It would have been a mammoth task.
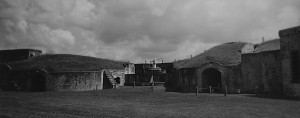
I used the 5/4 and took a shot of the main structures from the middle of the fort. It was fun shooting with film I look forward to developing the shot too see if I will be rewarded with a gem.
Back to the shots of the concrete structures I tried to take shots I could composite into, maybe I could have the structure buried in sand revealing some of the building. I collected a few shots mainly of structures to see what I can do with them via compositing.
The day was sunny and hot the sun was high but i think this helped to increase the contrast and light in the else dark concrete bunkers and tunnels. I may revisit this location and try some other techniques, maybe at night with lights inside or on a re enactment day to show the idea of the past use of the fort.
“bunkers and structures from the past”
From Fort Lytton. Posted by Daniel Bunce on 4/01/2016 (13 items)


Generated by Facebook Photo Fetcher 2
(Fort Lytton; 13 photos)
7th April
Into the darkroom

Its been a few years but I was guided through the precessing and timing. 1:1 = 50/50 The film container was 1.5L So I prepared the chemicals 750ml of Developer + 750ml of water. Stop 1.5L batch of water and 1,5L of fixer. In the dark I remove the plate film and fit 2 shots into the agitator seal the lid so it is light safe then with the lights back on. Referring to the charts on film type and exposure time I start the first 8 minutes in the developer agitating every 30 seconds for 15 seconds. Then 2 minutes in the stop followed by 8 minutes in the fixer. The fixer can be reused so it was re containered. To my success the development went very well and I have a great negatives to create a few test exposures with. Over the the darkroom to I set up the neg plate and timer, set the contrasts 4, 4, 4 as a starting point. Then do test exposures at 30, 20 , 10 seconds. I liked the tonal range at 20 but a few areas lost some detail in the final test I went 14 Seconds with a bit of dodging.
It is a lost of effort but worth every minute working with film I should do more of it.

Leave a Reply
You must be logged in to post a comment.